Shrimp Ceviche

Shrimp Ceviche


I found this to be a deliciously different way to serve shrimp.  Do you find that you are always making the same recipes and eating food the served the same way?  When you go out to eat do you always order the same dish or change it up a bit and try something new?  I’m all about trying new recipes – it’s always good to change things up instead of remaining status quo.  And what could be the worst thing to happen?  You don’t like it …oh well at least you tried!  ENJOY!

Cranberry Shrimp Ceviche Cups

Ingredients:

1 ½ teaspoons salt, divided

16 ounces  Medium Raw Shrimp, thawed

1 cup  Dried Cranberries

½ red onion, roughly chopped

½ cup fresh parsley

½ jalapeño, roughly chopped

¼ cup fresh lemon juice

¼ cup fresh lime juice

¼ teaspoon  Crushed Red Pepper or Ground Black Pepper

1 teaspoon  Oregano
Garnish:

13 ounces  Restaurant Style Tortilla Chips

2 limes, cut into wedges

Fresh cranberries (optional)

Directions:

  1. Bring a medium pot of water to a boil. Season with 1 teaspoon salt. Add shrimp and cook for 3 minutes. Immediately plunge cooked shrimp into an ice water bath. Peel shrimp and place in a flat dish.
  2. In a food processor, combine cranberries, red onion, parsley and jalapeño. Pulse until finely chopped. Add cranberry mixture to shrimp.
  3. Add lemon juice, lime juice, remaining ½ teaspoon salt, crushed red pepper and oregano. Stir to combine ingredients thoroughly. Refrigerate for 1 hour.
  4. To assemble: Spoon ceviche (about 4-5 shrimp each) into small clear cups or glasses. Garnish with tortilla chips, lime wedges and fresh cranberries.


Shrimp Ceviche

Pesto Grilled Shrimp Kabob & Pesto alla Genovese

Grilled Pesto Shrimp Kabob


Are you looking something super quick, super easy and super delicious?  Look no more!  Whip up some home-made pesto or if you are like me and have pesto in the freezer it is even quicker!  I ran out of pesto over the winter and determined not to be in that predicament ever again I planted a lot of basil in the garden this year and have made a gallon bag full of pesto already this summer.  I freeze it into ice-cube trays and then put it into freezer bags.  I will not ever, ever buy pesto in a jar ….. bleh!

Load up the skewers with shrimp and veggies and brush pesto over the shrimp.  I added red pepper and green onion.  On a preheated grill these will not take much more than 5 minutes – you do not want to over-cook shrimp … cook just until they turn pink and are no longer opaque.

ENJOY!


Pesto alla Genovese

Ingredients
1 1/2 cups fresh basil leaves (packed)
1/2 teaspoon salt
1/4 teaspoon freshly ground black pepper
1/4 cup freshly grated Parmigiano-Reggiano
2 tablespoons pine nuts or walnuts, toasted
1 teaspoon minced garlic
1/2 cup extra-virgin olive oil

Directions

In the bowl of a food processor, combine the basil, salt, and pepper and process for a few seconds until the basil is chopped. Add the cheese, pine nuts, and garlic and, while the processor is running, add the oil in a thin, steady stream until a mostly smooth sauce is formed. Transfer pesto to a bowl and set aside. (Note: Pesto may be made 1 day in advance and kept, refrigerated, in an airtight container, until ready to use. If making in advance, be sure to cover the top of the pesto with a thin layer of olive oil to prevent the pesto from darkening. Pesto may also be frozen in the same manner in small quantities for use at a later date.)

Pesto Recipe – Source:  foodnetwork

Spicy Cashew Shrimp Stir-Fry

Shrimp Stir Fry


This is a fantastic recipe and a great way to use your garden fresh snap or snow peas!  My garden snap and snow peas are doing awesome this year.  I am quite simply amazed at the height they have grown to … about 4 – 5 feet  tall! Even if you don’t have a garden, go ahead and try this stir fry.  Enjoy!

Ingredients (serves 4)

  • Shrimp
  • 4 Tablespoons soy sauce, divided
  • black pepper
  • 2/3 cup fat-free, reduced sodium chicken broth
  • 2 Tablespoons brown sugar
  • 1 1/2 Tablespoons Thai chili garlic sauce
  • 4 cloves garlic, minced
  • 2 Tablespoons sesame oil, divided
  • 2 large carrots, sliced thinly on the bias
  • 2 cups broccoli florets
  • 1 1/2 cups snap peas (or snow peas)
  • 1/2 onion, thinly sliced
  • 1/2 cup sliced water chestnuts
  • 1/2 cup chopped canned baby corn
  • 1/2 cup bamboo shoots
  • 3/4 cup cashews
  • 1 cup uncooked long grain white rice, cooked according to package directions

Instructions

  • Toss together shrimp, 1 Tablespoon soy sauce, plus a couple grinds of black pepper in a bowl then set aside. In a separate bowl, combine remaining soy sauce, broth, brown sugar, Thai chili garlic sauce, and garlic. Microwave for 20 seconds in the microwave, then stir and set aside.
  • Heat 1 Tablespoon oil in a lark wok or skillet over high heat. Add shrimp and cook until no longer pink on the outside, about 2-3 minutes. Add carrot, broccoli, snow peas, onion, bamboo shoots and remaining oil if needed, then stir fry for 5-6 minutes or until vegetables are crisp-tender. Add water chestnuts and baby corn, then stir to combine.
  • Add the sauce and cashews to the wok, then let sauce bubble for 2 minutes. Serve over cooked white rice.

Source:  Iowagirleats.com

Shrimp Stir Fry with Snow Peas in Coconut Curry Sauce

Shrimp Stir Fry in Coconut Sauce

I just planted snow peas in my garden last weekend.  When they are up and ready to be picked they will be perfect for this easy, delicious recipe.  Enjoy!

INGREDIENTS

Shrimp Stir Fry:
    • 1 pound shrimp, peeled and deveined (I used frozen and thawed them beforehand)
    • 2 teaspoons soy sauce
    • 1 can Water Chestnuts
    • 2 tablespoons vegetable oil
    • 1 bell pepper, cored, seeded, and sliced (any type will do)
    • 8 ounces snow peas, strings removed
    • 1 cup bean sprouts
    • 3 garlic cloves, minced
    • 1 tablespoon grated fresh ginger (scared of fresh ginger? don’t be…it can be peeled and frozen easily to be used at anytime)
Coconut-Curry Sauce:
  • 1 cup coconut milk
  • 1 tablespoon fish sauce
  • 1-2 teaspoons red curry paste (I used 2 teaspoons for a doubled recipe – this paste can be found in most grocery stores in the Asian foods aisle near the Thai ingredients)
  • 1 teaspoon light brown sugar
  • 1 teaspoon cornstarch

DIRECTIONS

  1. For the sauce, combine the sauce ingredients in a medium bowl (I doubled the sauce because we love extra sauce in our family). Set aside. Toss the shrimp with soy sauce. Heat 2 teaspoons of oil in a 12-inch nonstick skillet over medium heat until shimmering. Add shrimp and cook, stirring occasionally and breaking up any clumps, until curled and lightly browned, about 1 1/2 minutes. Transfer the shrimp to a clean bowl.
  2. Add 1 more tablespoon of oil to the pan and return to medium heat until shimmering. Add bell pepper and cook, stirring occasionally, until crisp-tender, about 2 minutes. Stir in snow peas and bean sprouts and cook for one more minute.
  3. Clear the center of the pan and add remaining 1 teaspoon oil, garlic and ginger. Cook, mashing garlic mixture into the pan with the back of a spatula, until fragrant, about 30 seconds. Stir in cooked shrimp. Whisk sauce to recombine and add to pan, bringing to a simmer. Cook until the sauce thickens, 1 to 2 minutes. Serve immediately.

Source:  Mel’skitchencafe.com

Grilled Sesame Crusted Ahi Tuna with Orange Ginger Soy Sauce

Grilled Ahi Tuna with Orange soy ginger sauce


Ahi tuna is one of my favorite and on the grill with an orange ginger soy sauce … oh yeah .that’s what I’m talking about!  Not only is this tuna delicious, but it’s healthy and quick.  This is a great meal for during the week when time is limited.  ENJOY!

Orange ginger soy sauce

  • 2 tablespoons mirin
  • 2 teaspoons white miso
  • 3 teaspoons grated fresh ginger
  • 1/3 cup plus 2 tablespoons fresh orange juice
  • 1 tablespoon low-sodium soy sauce
  • 1 tablespoon plus 2 teaspoons rice wine vinegar
  • 1/8 teaspoon red-pepper flakes
  • ¼ teaspoon sesame oil
  1. Combine all of the ingredients together in a bowl.
  2. Whisk until the miso dissolves. Serve with seared tuna.

Seared sesame crusted tuna

  • ¾ to 1 lb sushi grade yellowfin tuna
  • 3 tablespoons sesame seeds
  • 2 tablespoons black sesame seeds
  • 1 tablespoon canola oil
  1. Cut the tuna into 2-3 rectangular pieces.
  2. Mix the sesame seeds together on a plate.
  3. Press the tuna into the sesame seeds on all sides.
  4. Heat canola oil in a medium skillet over medium high heat.
  5. Sear the tuna for 20 seconds on each side, then transfer to a paper towel to drain. Let rest a couple of minutes.
  6. Slice  into ¼-thick pieces and serve with orange ginger dipping sauce.

Source:  Click Here

Grilled Ahi Tuna with Orange Soy Sauce

Easy and Elegant Appetizer – Smoked Salmon and Horseradish Mascarpone in Wonton Cups

Smoked Salmon in Wonton Cups

Are you looking for an elegant appetizer recipe?  This appetizer makes a fantastic presentation, tastes wonderful and best of all you won’t spend hours making it!

This is the first time I had purchased wonton cups and found them very easy to work with!  I’m already thinking of what I may fill them with next!  If you like smoked salmon I’m sure you’ll enjoy this!

Smoked Salmon & Horseradish Mascarpone in Wonton Cups

  • 24 square wonton skins
  • 1/2 cup mascarpone cheese, room temperature
  • 1 tbsp plus 1 tsp horseradish
  • 2 tsp finely chopped fresh dill
  • 1/8 tsp kosher salt
  • 1/8 tsp freshly ground black pepper
  • 6 oz. smoked salmon, cut into 24 equal pieces
  • Fresh dill springs

Smoked salmon in wonton cupsPreheat oven to 350 degrees F.

Cut about 1/2-inch off of two adjacent sides of each wonton wrapper to make a slightly smaller square. To make this process quicker, stack several wonton skins together at a time.

Spray a mini muffin tin lightly with cooking spray. Press one wonton skin in each muffin tin opening, slightly folding the skins in a couple of places to make them fit properly. Bake until crisp and golden brown, 5 to 7 minutes. Remove the wonton cups from the tin (remember, they will be hot) and cool on a wire rack.

In a medium bowl, stir together mascarpone cheese, horseradish, fresh chopped dill, salt, and pepper.

Fill each cup with 1 teaspoon of the mascarpone mixture. Top with a piece of smoked salmon folded into a loose rose. Garnish with sprig of dill. Repeat with smoked salmon and dill.

Makes 24 hors d’oeuvres.

Recipe Source: www.cookincanuck.com

smoked salmon in wonton cups

Toasted Coconut Tilapia with Pomegranate Salsa

Coconut Crusted Tilapia with Pomegranate Salsa

I was so happy to find yet another great recipe using pomegranate.  This is quick and delicious and doesn’t the pomegranate look pretty plated?  The combination of the sweet from the coconut and slightly sweet/sour pop of pomegranate is a winning combination.  ENJOY!

Toasted Coconut Tilapia with Pomegranate Salsa

YIELD: SERVES 2-4

TOTAL TIME: 30 MINUTES

ingredients:

4 tilapia filets
1/2 teaspoon salt
1/2 teaspoon pepper
1 lemon, cut in half
3 tablespoons coconut oil
1/3 cup unsweetened shredded coconut

salsa
1 tomato, chopped
1/2 red onion, finely diced
1/2 cup pomegranate arils
1/4 cup fresh cilantro, chopped
the juice of 1/2 lime
the juice of 1/2 orange
1/4 teaspoon salt

directions:

To toast coconut, add to a saucepan over low-medium heat and stir, cooking for about 4-5 minutes. As soon as mine starts to turn golden, I use a wooden spoon and toss continuously until it’s evenly toasted. Set aside.

Season tilapia on both sides with salt, pepper and lemon juice. Heat a large nonstick skillet over medium to medium-high heat and add coconut oil. Once the oil is completely melted, add tilapia and cook until the edges are opaque, about 3-4 minutes. Using a spatula, gently flip the fish. Immediately cover in half of the toasted coconut mixture, and as the fish cooks the coconut will somewhat “adhere” to it. Once the tilapia is easily flaked with a fork, remove it from the skillet and top with the remaining toasted coconut if desired. Serve with pomegranate salsa on top!

salsa
Combine all ingredients together and mix! Can be stored in the fridge for 2-3 days.

Source:  Howsweeteats.com

Coconut Crusted Tilapia with Pomegranate Salsa

Grilled Ahi and Arugula Salad with Ginger-Soy Dressing

Grilled Ahi Tuna 5-30-13

My garden is thriving this spring with a lot of Arugula, which became my favorite “green” last year.  I had no idea it was a powerhouse packed full of nutrition until I started reading about it.  Did you know?

“Arugula is a low calorie, nutrient rich vegetable from the Brassicaceae family that includes mustard greens, radishes, cauliflower and kale. Sometimes called “garden rocket,” a term derived from its scientific name Eruca sativa, arugula is a great alternative to iceberg lettuce because it offers a much greater density of nutrients with the same low calories.

Here are 10 health benefits of arugula:

Cancer Prevention
Arugula is a cruciferous vegetable. Cruciferous vegetables are associated with reduced risk of cancer in many studies. Arugula is rich with valuable antioxidants, considered essential in preventing free radical activity in the body. Studies show that vitamin A and flavonoid compounds in arugula may help protect the body from skin cancer, lung cancer and oral cancer. Arugula is also a rich source of phytochemicals like sulforaphane, which has excellent chemoprotective effects and helps to fight carcinogens.

High In Antioxidants
Arugula is dense with the natural antioxidants vitamin C, vitamin K and vitamin A. In addition to fighting free radical activity, these vitamins offer great immune system support.

High In Vitamin C
Vitamin C is a well known as a powerful antioxidant that helps prevent cancer, boosts the immune system and fights the common cold.

High In Vitamin A
Vitamin A is a powerful antioxidant, boosts immunity and is great for the eyes, skin, bones and teeth.

High In Vitamin K
Three cups of arugula provide over 100% of your daily vitamin K needs.Vitamin K is known to promote bone health and brain function while acting as an anti-inflammatory and antioxidant.

Eye Health
Arugula is a good source of carotenoids, fat-soluable pigments that are known to help prevent macular degeneration. The vitamin C in arugula may help in the prevention of cataracts.

Mineral Rich
Arugula is also a good source of calcium, iron, potassium, manganese and phosphorous, all essential minerals that offer their own unique health benefits.

Low in Oxalate
Oxalates inhibit mineral absorption in the body. Other healthy leafy greens, such as spinach, have high levels of oxalate. However, arugula appears to offer relatively low levels of oxalate, making it a healthier alternative for people seeking foods high in calcium and other essential minerals.

Bone Health
Low levels of oxalates combined with a great variety of vitamins and minerals found in arugula make it great for bone health. One study of Vitamin K found that daily consumption of the vitamin led to decreased risk of bone fractures. Calcium, potassium, magnesium, manganese and vitamin C are all considered good contributors to positive bone health.

Weight Loss
Though arugula has no proven ability to help aid in weight loss in and of itself, it remains a low calorie, nutrient rich food, and thus a great addition to any healthy diet.”
Source:  healthdiaries.com

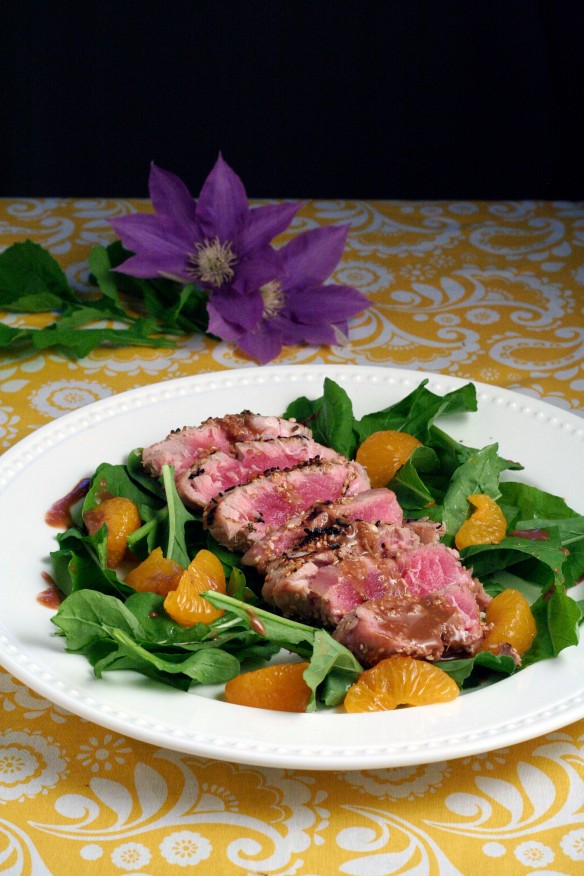
To sum up this recipe in one word – Outstanding!  I liked this so much I made it the next night too!  It’s bursting with Asian flavors of soy and fresh ginger and a bite of mandarin oranges mixed in … simply spectacular! Enjoy!


Seared Ahi & Arugula Salad with Ginger-Soy Dressing

Ingredients:

1 1/2 pounds tuna steaks
sea salt & fresh ground pepper
1 tablespoon sesame oil
1 1-inch hunk of ginger
4 garlic cloves
1 teaspoon wasabi or 1 tablespoon dijon mustard
1/4 cup honey
1/4 cup soy sauce
1/3 cup mayonnaise
4-5 cups baby arugula
1 cup edamame
3-4 clementines, peeled and sectioned or mandarin oranges

Directions:

Heat grill, Rub tuna steaks with sesame oil and grill 2-3 minutes per side (do not over-cook) . Remove the grill and allow it to sit for a few minutes before slicing with a very sharp knife.

In a blender or food processor, combine the ginger, garlic, wasabi or mustard, honey, soy sauce, and mayonnaise until very pureed. Drizzle over everything.

Toss together the arugula, edamame, and clementines. Serve with rice and sliced seared tuna.

Grilled Ahi Tuna 5-30-13 - Horizontal

Source:  cheekykitchen.com

Tilapia with Strawberry Salsa – You Must try it to Believe It

Tilapia with Strawberry Salsa 4-28-13 - Bog V

I have to admit I was skeptical making this recipe.  I do enjoy fruit salsa on fish but I just wasn’t sure about strawberries.  As soon as I took my first bite I loved it.  It’s a nice change from a mango salsa and goes perfectly with fish.  I’ve also made this with salmon which is awesome!  This is one of my new “go to” salsa recipes.  Give it a try …  Enjoy!

Tilapia Fillets & Strawberry Salsa (serves 2)

  • 2 tilapia fillets
  • 1 tbsp butter
  • 1 tsps lemon juice
  • 5 large strawberries, de-topped and finely chopped
  • 1 tbsp finely chopped white onion
  • 2 tsps lime juice
  • 1 tsp red wine vinegar
  • 1/2 tsp grated ginger
  • 1 jalapeno pepper, finely chopped or 1 tablespoon Thai Red Chili Sauce
  1. Mix the strawberries, onion, jalapeno, ginger, lime juice and red wine vinegar together. Stir well and let sit in the fridge for at least 15 mins so the flavors can mingle.
  2. Generously season each fillet, pour lemon juice over both and place 1/2 tbsp of butter on each. Grill until fish turns opaque and flakes easily.
  3. Serve with a spoonful of salsa.

Source:  thingsmybellylikes.com

Tilapia with Strawberry Salsa - 4-28-13 Blog

Fresh Pasta With Shrimp in Creamy Tomato Sauce

Fresh Pasta with Shrimp in Creamy Tomato Sauce

It has been a little while since I made fresh pasta and I found myself craving it.  I also had oven-roasted tomatoes left in the freezer from last year’s crop of tomatoes and thought this would  be a perfect way to use them.  This recipe turned out awesome, one of my new favorites.  I’ll be making this again, especially when my tomatoes ripen on the vine this summer!  (I can hardly wait!!)  Enjoy!

Ingredients:

  • 3 tablespoons olive oil
  • 1 pound uncooked large shrimp, peeled, deveined
  • 1 cup oven roasted tomatoes*
  • 1/2 cup sliced pitted Kalamata olives or other brine-cured black olives
  • 6 garlic cloves, chopped
  • 1 teaspoon grated lemon peel
  • 1/2 teaspoon dried crushed red pepper
  • 1 28-ounce can diced tomatoes in juice, drained
  • 1/2-1 Cup Heavy Cream
  • 1/4 Cup reserved pasta water
  • 1/4 Cup Parmesan Cheese
  • 1/2 cup chopped fresh basil
  • 1 Pound fresh Fettuccine

*Oven Roasted Cherry Tomatoes – Ina Garten

Heat 2 tablespoons oil in heavy large pot over medium-high heat. Add shrimp and sauté until pink, about 2 minutes. Using slotted spoon, transfer shrimp to medium bowl. Add remaining 1 tablespoon oil to same pot. Add oven roasted tomatoes, olives, garlic, lemon peel, and crushed red pepper. Sauté about 4 minutes. Add canned tomatoes and some of the juice and simmer until sauce thickens, about 3 minutes. Mix in cream, Parmesan Cheese, and reserved pasta water.  Mix in basil. Return shrimp and any juices to sauce; stir to heat through, about 1 minute.

Meanwhile, cook pasta in pot of boiling salted water until tender, but still firm to bite. Drain. Add pasta to sauce. Toss over medium heat until sauce coats pasta. Season with salt and pepper. Transfer to bowl; top with additional cheese if desired.

Fresh Pasta with Shrimp in Creamy Tomato Sauce

Adapted from:  Epicurious.com