French Macaron with Tart Cherry Chocolate Ganache

Image

French Macaron with Tart Cherry Chocolate Ganache

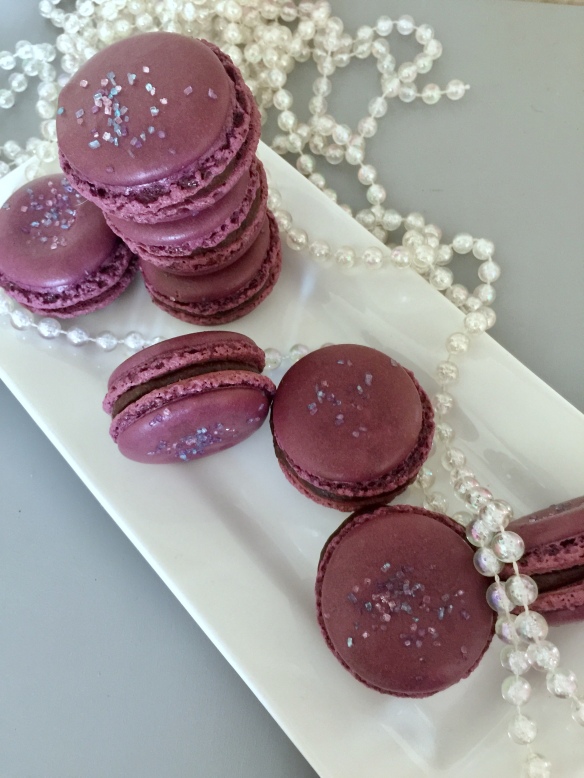
I’m a huge fan of tart cherry anything and have a couple of freezer bags of tart cherries that I picked this summer just waiting to be used.  Chocolate and Cherry are a marriage made in heaven and in this macaron they are delicious!  I used the standard recipe for french macarons from wilton.com  and created my own recipe for the filling.


Tart Cherry Chocolate Ganache Filling

Ingredients:

  • 1 Cup Semi Sweet Chocolate Chips
  • 1/2 Cup heavy whipping cream
  • 1 Cup pitted tart cherries
  • 2 Tablespoons Amaretto
  • 1 Tablespoon butter

Directions:

Saute pitted cherries in 1 tablespoon of butter until soft; add 2 tablespoons Amaretto and saute an additional 5 minutes.  Add tart cherry mixture to a food processor and process to a thick puree.

Heat heavy cream to almost a boil (bubbles will appear around the outside of the cream) and pour over chocolate chips.  Wait 2 minutes and stir until smooth.  Add cherry puree and stir.  Put in fridge to desired thickness.  Pipe ganache onto macaron.

Enjoy!

French Macaron – Lemon with Lemon Lavender Ganache

img_8911
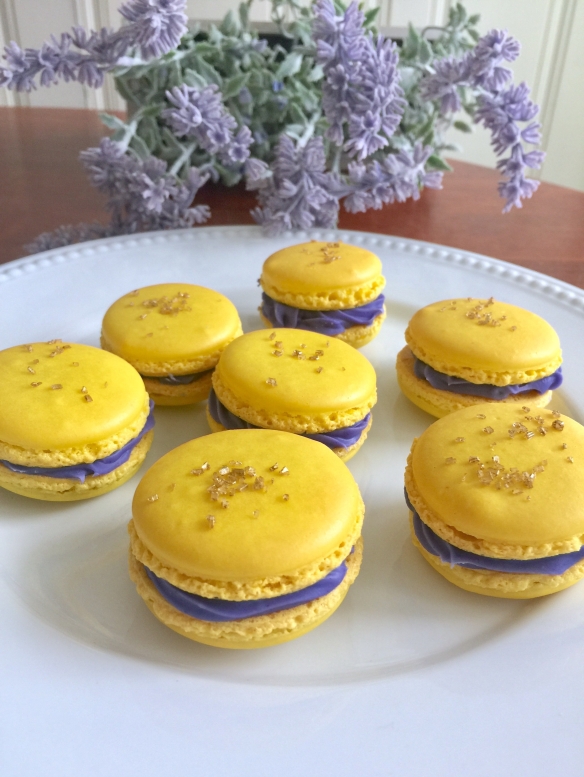
I challenged myself with baking French Macarons.  From everything I read French Macarons are indeed a challenge with a multitude of things that can go wrong.  My first batch were under baked.  My second batch had feet that spread (oven temp. too high – adjustments need to be made) and my 3rd, 4th, 5th, 6th and 7th batch have been perfect!  When my first perfect batch came out of the oven it was just myself and my puppy in the kitchen – I did a happy dance and we did a high five!

Macarons are my newest obsession – they are so much fun and can be made in so many different colors and flavors the list goes on and on and on.  My co-workers love it – I have Macaron Monday every week and they get to eat my Macarons and I get to try new flavors and colors – it’s  a win win.


French Macaron  (Adapted from Wilton.com)

INGREDIENTS

1/2 Teaspoon Lemon Extract

1/2 Teaspoon Vanilla

2 Cups Confectioners’ Sugar

1 Cup almond flour

3 egg whites (room temperature)

1/4 teaspoon cream of tartar

pinch of salt

3 teaspoons granulated sugar

Step 1

Preheat oven to 275°F. Prepare 2 cookie pans with parchment paper. Fit a 16 in. decorating bag with tip 1A.

Step 2
Step 2

Sift confectioners’ sugar and almond flour together, discarding any bits of almond flour that are too large to pass through the strainer.

Step 3
Step 3

In a large bowl, beat egg whites, cream of tartar and salt on high speed until foamy, then with the mixer running, slowly add the sugar. When the mixture reaches soft peaks, add lemon, vanilla and color.

Step 4
Step 4

Continue whipping just until mixture forms stiff peaks.

Step 5
Step 5

Gently pour the almond mixture over the whipped egg whites so they don’t deflate. Using a rubber spatula, gently fold the almond flour mixture into the egg whites until the mixture holds a 10 count, meaning when batter falls from the spatula to the bowl it takes about 10 seconds until it fully blends into the rest of the bowl in the batter. This way, the almond mixture is fully hydrated but egg whites still retain some air. The mixture is thick enough to pipe without running everywhere, but the peak at the top of each piped cookie will fall on its own, making a perfectly smooth cookie. This takes about 45 turns, but depending on how aggressively you fold, it can be more or less.

Step 6

Transfer the batter to the prepared decorating bag.

Step 7
Step 7

Pipe 1 inch rounds of batter onto the parchment lined pans, spacing at least 1 inch apart.

Step 8

Tap the pans hard on the countertop 4-5 times to release trapped air, and then let sit at room temperature for 20-30 minutes or until the unbaked macaron form a skin and do not stick to your finger when touched. Allowing the macaron to crust over is what leads to their signature “feet,” the holey ring that arises during baking at the base of each cookie.

Step 9

Bake for 18-22 minutes on a shelf in the center of the oven. If baking 2 pans at a time on different oven racks, rotate the pans from bottom to top midway through baking. There isn’t a great visual on how long to bake macaron. When underbaked, the centers can be wet. When overbaked, they start to brown slightly and become very crunchy instead of crisp on the top with a softer interior.

Step 10
Step 10

Cool the macaron completely on a cooling grid before sandwiching with your filling of choice. Flavored buttercreams, jams, and chocolate ganache are all great options.

Makes 36 to 48 sandwiched cookies.

Lemon Lavender Ganache

1/2 Cup Heavy Whipping Cream

1 teaspoon culinary food grade lavender buds

1 Teaspoon Lemon Extract

8 oz. white chocolate
Heat heavy cream just until barely  boiling and add lavender.  Let sit in fridge at least 5 hours to infuse flavor.  Strain out the lavender buds, reheat and pour over white chocolate.  Let sit for 2 minutes and stir to combine with lemon extract and food coloring if desired.


Garlic Scape Hummus and the Best Ever Pita Chips

Garlic Scape Hummus

What is growing in your garden this year?  One of the things I am picking is garlic scape (those cool green spiral thingies that grow out of your garlic plant pictured above).  I am also picking sugar and snap peas and radishes.

Grow garden …grow

Cher's Garden

If you are growing garlic don’t miss out on picking these garlic scapes.  Garlic scape are milder in taste than garlic and are awesome stir fried in a pan with other vegetables, made into garlic scape pesto, or as I just discovered, made into Garlic Scape Hummus.

Garlic Scape Humus

INGREDIENTS:

1/2 cup chopped garlic scapes
1 tablespoon lemon juice
½ teaspoon sea salt
Ground black pepper (to taste)
1 can (15-ounces) chickpeas, rinsed and drained
¼ cup olive oil

DIRECTIONS:

1. In the bowl of a food processor, process the garlic scapes, lemon juice, sea salt and black pepper until finely chopped, scraping the sides as needed.

2. Add the chickpeas and process to a rough puree (the chickpeas will be just about completely mashed).

3. With the machine running, slowly pour in the olive oil and process until smooth. Check the consistency; if it is still thick and paste-like, you can add 2 or 3 tablespoons of water to thin it out a bit. Taste, and add more salt and pepper, if desired. Serve with your favorite vegetables, pita chips, etc.

Now don’t say I didn’t warn you … if you make these home-made pita chips you will never ever buy them in the store again.  You will tell yourself  “I’m only going to have one more” … after having had about 10… they are that good and super easy.

Homemade Pita Chips
Ingredients
3 pitas, cut into 8 wedges
4 tablespoons olive oil
1 clove garlic, smashed
Salt and freshly ground black pepper
Directions
Preheat heat oven to 375 degrees F.

Cut pitas into 8 wedges. Pour olive oil into a bowl and add garlic, salt and pepper. Brush pita chips olive oil and garlic mixture. Arrange pita chips on baking sheet and bake for 12 to 15 minutes.

Recipe courtesy of The Neelys – FoodNetwork

Part II – Penne with Swiss Chard and Bacon – Plus 2 Ingredients

Penne with Swiss Chard and Bacon

There is so much to love about pasta,one of the things I love is that pasta is so versatile.  You can add and modify ingredients and it still tastes unbelievable.  My brother, Gary, has an adventurous spirit in and out of the kitchen and is so much fun to be around.  He sent me the above picture enjoying his pasta.  I wish we lived closer to each other for so many different reasons, one of which it would be fun to try each others cooking creations.

Gary made my Bacon and Swiss Chard with Penne recipe even better with the addition of two ingredients:  Tomatoes and fresh chopped basil.  Just add these at the end and toss with pasta.

Thanks Gary!

Try it both ways!  Enjoy!!

Double WOW Recipe – Bacon and Swiss Chard with Penne

Bacon and Swiss Chard with Penne Wow … make that a double WOW!  For so few ingredients and such an easy recipe this definitely gets a double wow for flavor.  I was looking for something quick to make after work using ingredients I already had at home.  I have a lot of swiss chard growing in the garden and I had bacon … and I always have pasta and garlic.  I loved it!  Give it a try, you can’t go wrong with a double WOW recipe!  ENJOY!

Ingredients

  • 1 pound penne
  • 12 ounces bacon, cut crosswise into 1/2-inch slices (I used only 3 slices of thick bacon)
  • 1/2 – 1 cup chopped onion
  • 2 cloves of garlic, chopped
  • 6 stems from Swiss Chard, chopped
  • 2 large bunches Swiss Chard, chopped (about 12 cups)
  • 2 tablespoons balsamic vinegar
  • 1 tablespoon extra-virgin olive oil
  • 2/3 cup freshly grated Parmesan cheese

Preparation

Cook penne in large pot of boiling salted water until tender but still firm to bite, stirring occasionally. Drain, reserving 1 cup pasta cooking liquid. Meanwhile, cook bacon in heavy large pot over medium heat until beginning to crisp, about 10 minutes. Transfer to paper towels to drain. Drain all but 2 tablespoons bacon drippings from skillet. Add onion, garlic and Swiss Chard stems  and saute over medium-high heat until softened, about 7 minutes. Add Swiss chard and sprinkle with salt and pepper. Add the reserved 1 cup of pasta cooking liquid to skillet. Toss until chard is wilted and tender, about 4 minutes. Sprinkle 2 tablespoons Balsamic Vinegar over; cook 1 minute. Add penne and oil to sauce in pot and toss to coat. Transfer to large bowl. Sprinkle with bacon and cheese. Season to taste with salt and pepper.

Adapted from:  Epicurious.com

Bacon and Swiss Chard with Pasta

Grilled Chicken Quesadillas

Quesadilla - Blog

Wow … why did I never make these before?!  That is the question I asked myself after making these quesadillas.  They are ridiculously good and so easy.  In fact, they are so good, that Tim who doesn’t usually comment on food said after being stuffed and eating too much “why do you have to make these so good!”.

I was prompted to make quesadillas after going to a local mexican restaurant and ordering quesadilla that were really inedible.  They were full of grease and so disappointing.  I love quesadillas, good quesadillas that is, and thought well I’ll just make them at home.  I’m so glad I did as they have become a regular staple at our house.  You can easily switch out the chicken for grilled steak.  I hope you enjoy them as much as we did!

Pico de Gallo Chicken Quesadillas 

Ingredients:

  •  2 tomatoes, diced
  • 1 onion, finely chopped
  • 2 limes, juiced
  • 2 tablespoons chopped fresh cilantro
  • 1 jalapeno pepper, seeded and minced
  • salt and pepper to taste
  • 1 tablespoon olive oil
  • 2 skinless, boneless chicken breast grilled cut into strips
  • 1/2 onion, thinly sliced
  • 1 green bell pepper, thinly sliced
  • 2 cloves garlic, minced
  • 4 (12 inch) flour tortillas
  • 1 cup shredded Monterey Jack cheese
  • 1/4 cup sour cream, for topping

Quesadilla2H-Blog

Directions:

1. In a small bowl, combine tomatoes, onion, lime   juice, cilantro, jalapeno, salt and pepper. Set aside.
2. Put 1 tablespoon of olive oil in the hot skillet and saute the sliced onion and green pepper until tender. Stir in the minced garlic and saute until the aroma is strong. Mix in half of the pico de gallo and chicken breast meat. Set aside; keep warm.
3. In a heavy skillet, heat one flour tortilla.   Spread 1/4 cup shredded cheese on the tortilla and top with 1/2 the chicken   mixture. Sprinkle another 1/4 cup cheese over the chicken and top with   another tortilla. When bottom tortilla is lightly brown and cheese has   started to melt, flip quesadilla and cook on the opposite side. Remove   quesadilla from skillet and cut into quarters. Repeat with remaining ingredients. Serve quesadillas with sour cream and remaining pico de gallo.Tip:  When flipping quesadilla put a dinner plate over the pan with the quesadilla and flip onto plate then just slide onto the pan to heat the other side!  Works like a charm!Source:  Allrecipes.com

Versatile Blogger Award – What a Nice Surprise

What a nice surprise I had when I discovered I had been given the Versatile Blogger Award by my blogger friend The Sandwich Lady.  Being a fairly new blogger it feels great to know my blog is being read and enjoyed.  Thank you so much Sandwich Lady for putting a smile on my face and making my day!  Check out Catherine’s blog – it is interesting and well written!  The sub-heading to her blog is “For people sandwiched in the middle of life and relationships” http://catherinebuday.wordpress.com/

According to tradition, if one receives the versatile blogger award they are a to thank the person that gave it to them (really? that should go without saying), post 7 random facts about themselves and award the Versatile Blogger Award to 15 other worthy bloggers and notify them that they have received the award.

So here are 7 random facts about myself:

  1. I have green eyes, which change according to the light, sometimes with yellow specks.
  2. I laugh in my sleep.  Also unbeknownst to me, I sleep on my back with my leg bent and the other leg folded over my knee.   Ahhhh I must be a comfortable laid back sleeper.  Lol
  3. I have traveled to and vacationed at 7 Caribbean islands.  I love to travel and if I had the resources I would travel the world.  The number one place I want to visit is Italy.
  4. I have a clothing obsession; although I have improved and I’m working on this (I have given away garbage bags full of clothing to charity).   I have four closets of clothes, one of which is arranged by color.
  5. I am kind-hearted and easy-going, although I have been told I’m too sensitive at times.
  6. I got my first dog when I was 40 and now I am a devoted dog lover and couldn’t imagine a life without my boys (dogs)  They are awesome!
  7. I developed a fear of heights in my 20s.  Don’t ask me why – I have no idea!

I thought about the last requirement … award 15 other bloggers with the Versatile Blogger Award.  I’ve decided to buck tradition and create a new one.  I will only be awarding 4 bloggers; for a few reasons:  due to time constraints I only follow about 17 bloggers, some of the bloggers I would have liked to award already have received the award. 

4 bloggs that I will be passing the award to are:

http://iamsimplytia.com/  (Tia has a food blog)

http://malouprestado.wordpress.com/ (Malou has a travel & food blog)

http://seattlefoodshed.wordpress.com/ (Mary has a food blog and has an urban farm in Seattle)

http://corkandspoon.wordpress.com/ (Ruth & Emilie have a food blog)

Please take a look at their blogs – all are wonderful and deserving of this award. 

Congratulations!

Peanut Butter Dog Cutout Cookies

We can’t forget our Canine “kids” during the holiday season!

The time between Thanksgiving and New Year’s is extremely busy with Christmas shopping, decorating the house, holiday parties, baking, and cooking and a zillion other things we need to get done.  I’ve been baking Christmas cookies this weekend and I didn’t want the “boyz” (our dogs Irish & Bailey) to be left out.  I discovered this fantastic holiday treat I could bake for them. 

Our Canine “kids” are the ones that are so happy to see us when we come home they act like they haven’t seen us for months!  They are loyal, enthusiastic and give us unconditional love.  They are our constant companions and make us smile, laugh and fill our hearts with joy, so this Christmas and every day they deserve all the love and attention and special treats we can give them!  By the way, the “boyz” loved their peanut butter cookies!!

Peanut Butter Dog Cutout Cookies

Ingredients:

  • 2 Cups whole wheat flour
  • 1 Tablespoon baking powder
  • 1 Cup all natural peanut butter
  • 1 Cup lowfat or skim milk
  • 1/2 Cup oatmeal

Preheat oven to 350 degrees and lightly grease a cookie sheet.

In a medium mixing bowl, add the flour, baking powder and oatmeal.  Once that’s mixed, add the peanut butter and milk.  Stir it together until a dough forms.

Roll the dough out on a floured board, using cookie cutters, cut into desired shapes.

Bake on the lightly greased cookie sheet for about 15-20 minutes.

Once cool, let your favorite pup enjoy before storing them in the refrigerator for up to 2 weeks or freeze for longer storage.

Girlie Girl Aprons

I love girlie girl things and couldn’t resist these aprons.  These are certainly not your grandmother’s aprons!

WIth this apron I feel as though I should be looking out my window at palm trees and the ocean!

And one to match my kitchen.

And one for “a night on the town”

Bling …

These aprons are fun and flirty … who can resist girlie girl aprons!

Bye Bye Summer I’ll Miss You . . .

Things I will miss about summer . . .

My Flower Gardens

The smell of the fresh-cut grass . . .

Birds singing in the morning . . .

Butterfly’s dancing in the wind . . .

Fresh garden tomatoes

Herbs from my garden . . . basil and rosemary

Fresh veggies from the farmer’s market

Sweet, plump, juicy strawberries

A warm summer breeze . . ..
Fresh air blowing the curtains open . . .

Opening my window in the morning
to unveil flowers growing . .

Hanging out in the yard enjoying the sun with “the boyz”

These are just a few of things I will miss about summer … bye bye summer . . . until next year.