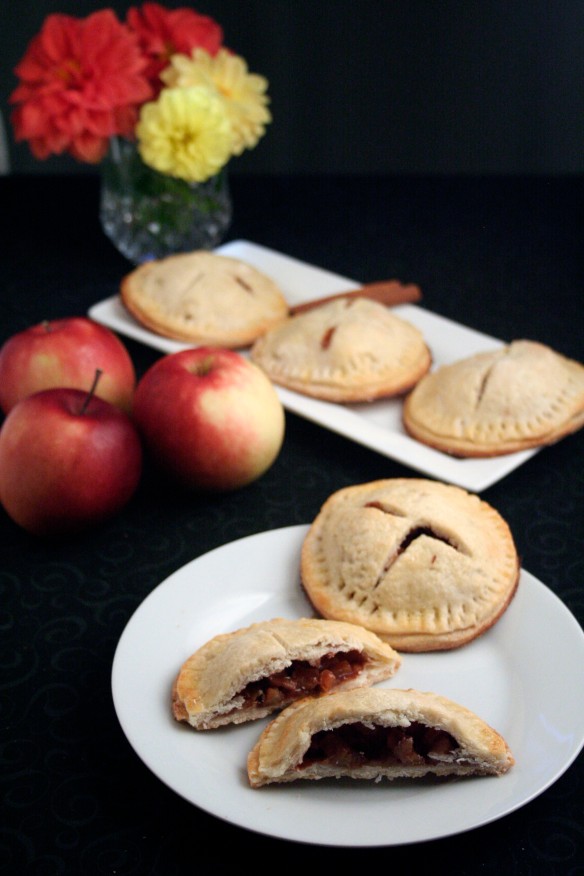
French Macaron with Tart Cherry Chocolate Ganache

Image

French Macaron with Tart Cherry Chocolate Ganache

I’m a huge fan of tart cherry anything and have a couple of freezer bags of tart cherries that I picked this summer just waiting to be used.  Chocolate and Cherry are a marriage made in heaven and in this macaron they are delicious!  I used the standard recipe for french macarons from wilton.com  and created my own recipe for the filling.


Tart Cherry Chocolate Ganache Filling

Ingredients:

  • 1 Cup Semi Sweet Chocolate Chips
  • 1/2 Cup heavy whipping cream
  • 1 Cup pitted tart cherries
  • 2 Tablespoons Amaretto
  • 1 Tablespoon butter

Directions:

Saute pitted cherries in 1 tablespoon of butter until soft; add 2 tablespoons Amaretto and saute an additional 5 minutes.  Add tart cherry mixture to a food processor and process to a thick puree.

Heat heavy cream to almost a boil (bubbles will appear around the outside of the cream) and pour over chocolate chips.  Wait 2 minutes and stir until smooth.  Add cherry puree and stir.  Put in fridge to desired thickness.  Pipe ganache onto macaron.

Enjoy!

Mr. and Mrs. Claus

Mr. and Mrs. Claus

Decorated Sugar Christmas Cookies

I love baking Christmas cookies; especially sugar cookies.  There are so many fun cookie cutters … I just love Mr. & Mrs. Claus and the traditional colors of Christmas.  These cookies were decorated with Royal Icing.  I taught myself to decorate cookies with Royal Icing several years ago.  I read a lot of blogs on how to decorate and found  Sweet Sugar Belle to be a very talented cookie decorator with a lot of tutorials and great tips!  There is still time … so go ahead and get your supplies and get your sugar cookies and mad decorating skills on, put on some Christmas music and have fun!

This recipe for sugar cookies is really good – the dough doesn’t spread when baking and the cookies are perfect!  Sometimes I omit the almond flavoring and just double up the vanilla.  Always use the best ingredients possible when baking … it makes a difference!

Recipe Source:  food.com

Kittencal’s Buttery Cut-Out Sugar Cookies

Ingredients:
1 cup butter, softened (no substitutes)
1 cup sugar
2 eggs
1/2 teaspoon vanilla (I use Madagascar Vanilla)
1/2 teaspoon almond extract
3 1/4 cups all-purpose flour
1/2 teaspoon baking soda
1/2 teaspoon baking powder
1/2 teaspoon salt

Directions

  1. For cookies; in a large bowl combine butter with sugar, eggs, vanilla and almond extract; beat using an electric mixer on high speed until light and fluffy.
  2. In another bowl combine the flour with baking powder, baking soda and salt; gradually stir into the butter mixture until well blended.
  3. Cover bowl with plastic wrap and chill for 2 hours.
  4. Set oven to 400°F.
  5. Line cookie sheets with parchment paper (do not grease cookie sheets use parchment paper only)
  6. On a very lightly floured surface roll out the dough into about 1/4-inch thickness.
  7. Cut into desired shapes using cookie cutters.
  8. Place cookies 2-inches apart on cookie sheet.
  9. Bake 8-9 minutes (oven temperatures vary so keep an eye on the cookies)

(I do not use the icing recipe that come with this cookie recipe.)

I’m Seeing Bunnies in My Sleep

Bowtie Bunny

I spent this week-end baking and decorating sugar cookies for Easter.  I usually make cookies for everyone in the office during Christmas time and this past Christmas slipped by without decorating any sugar cookies.  This year everyone is getting Easter cookies.

The recipe I use can be found in this post Sugar Cookie Recipe.  If you’ve never decorated sugar cookies with royal icing I encourage you to give it a try.  It’s really not hard, it’s fun and the cookies are adorable.  There are several sites on line that give step by step instructions on decorating with Royal Icing.  Enjoy!

Chick in Egg

Bunny

Bunny on Egg

Easter Egg


Black Raspberry Pie – A Taste of Summer


Fresh Black Raspberry Pie


Black Raspberries remind me of summer … summer in Vermont where I grew up.  If I close my eyes I can see the fields and feel the grass on my bare feet and smell summer in the air.  Black raspberries/black berries grew wild on large bushes in a field near my house.  I was young, with not a care in the world, except to pick black raspberries and plop the sun ripened berries into my mouth one after the other.

Sigh … I am not as young any more and now I live in Ohio where black raspberries do not grow wild near my house and I cannot pick them for free.  I did, however, find a wonderful berry farm about 45 minutes from my house and the black raspberries were delicious … and yes, I still plopped them into my mouth … one after the other.

I picked enough berries to make my first ever Black Raspberry Pie.  WHY have I never made this pie before.  Bursting with fresh black raspberries and few ingredients, this pie way exceeded my expectations; which just goes to prove my saying that the simplest things in life bring the most pleasure.  ENJOY!

Fresh Black Raspberry Pie

Old Fashioned Black Raspberry Pie

INGREDIENTS:

  • CRUST
  • Double Crust (Your favorite pie crust recipe)
  • FILLING
  • 4  or 5 cups fresh or frozen and partially thawed black raspberries
  • 1 1/4 cups sugar
  • 6 tablespoons cornstarch
  • 2 tablespoons butter, softened
  • Dash of salt

PREPARATION DIRECTIONS:

PREPARE recipe for double crust pie. Roll out dough for bottom crust. Place in 9-inch pie plate. Press to fit without stretching dough. Trim even with pie plate. Do not bake

HEAT oven to 350ºF.

COMBINE blackberries, sugar, cornstarch, butter and salt. Toss gently. Spoon into unbaked pie crust. Moisten pastry edge with water.

ROLL out dough for top crust. Place onto filled pie. Trim 1/2-inch beyond edge. Fold top crust under bottom crust edge to seal. Crimp and flute edges. Cut slits in top crust or prick with fork to allow steam to escape.

BAKE 1 hour or until filling in center is bubbly and crust is golden brown. Cool to room temperature before serving

Recipe Source:  http://www.crisco.com

What is worth a splurge and is filled with red raspberries and dark chocolate?

Bakery Style Muffins with Red Raspberries and Dark Chocolate


Bakery Style Muffins with Red Raspberries and Dark Chocolate …. YES, PLEASE!

This was the best recipe find EVER for muffins!  I’ve tried so many muffin recipes over the years to get that “bakery style muffin” to no avail … until now that is.  These muffins are over the top … large and delicious.  They are moist and bursting with fresh raspberries and dark chocolate – a match made in heaven!  I liked these so much that I made 2 batches. I added more raspberries to the second batch … personal preference.  Then I wrapped them up and put them in the freezer … just because I was tempted to have more than one.  ENJOY!

Source:  Sallysbakingaddiction

Ingredients

  • 3 cups (375 grams) all-purpose flour (very careful not to over-measure)
  • 4 teaspoons baking powder
  • 1/2 teaspoon salt
  • 1 teaspoon ground cinnamon
  • 2 large eggs, at room temperature
  • ¾ cup (150 grams) granulated sugar
  • ¼ cup (50 grams) light brown sugar
  • 1 cup (240 ml) milk, at room temperature (I prefer buttermilk)
  • ½ cup (120 ml) canola/vegetable oil (or melted coconut oil)
  • 1 teaspoon vanilla extract
  • 2/3 cup (120 grams) dark chocolate chips, (or semi-sweet)
  • 1 and ¼ cup (215 grams) fresh raspberries*
  • coarse sugar

Directions:

Preheat oven to 425F degrees. Spray jumbo muffin pan with non-stick spray. Set aside.

In a large bowl, gently toss together flour, baking powder, salt, and cinnamon. Mix until all dry ingredients are combined – a 20 second toss to disburse everything together. Set aside.

In a medium bowl, whisk together eggs, granulated sugar, and brown sugar until combined. Mix in milk, oil, and vanilla extract. Mixture will be pale and yellow. Fold wet ingredients into dry ingredients and mix everything together by hand. *Avoid over-mixing,* which will produce tough, dry muffins. Gently mix until all the flour is off the bottom of the bowl and no big pockets of flour remain. The batter will be extremely thick and somewhat lumpy. Fold in the chocolate chips, then *very gently to avoid them from leaking their color,* fold in the raspberries.

Spoon batter into prepared muffin tins, filling all the way to the top. Sprinkle with coarse sugar. Bake at 425F degrees for 5 minutes. Keeping the muffins in the oven, reduce oven temperature to 375F and continue to bake for 25-26 minutes until tops are lightly golden. A toothpick inserted in the center should come out clean. Allow to cool for 10 minutes. Muffins taste best fresh the same day. Store muffins at room temperature in an airtight container for up to 5 days.

Raspberry and Dark Chocolate Muffins

Sugar and Spice and Everything Nice! Apple mini pies

Apple Hand Pie

Apple Hand Pies

What is sugar & spice and everything nice?  If you guessed mini apple pies you are right!  This is the first time I made apple hand pies. They couldn’t be easier or more delicious.  In my opinion anything with a fantastic homemade crust with cinnamon and apples is delicious.  Hands down … this is a winner.  ENJOY!

French Pastry Pie Crust (I love this pie crust – it comes together beautifully)

INGREDIENTS:
3 cups all-purpose flour
1 1/2 teaspoons salt
3 tablespoons white sugar
1 cup shortening
1 egg
1 teaspoon distilled white vinegar
5 tablespoons water
DIRECTIONS:
1. In a large mixing bowl, combine flour, salt, and sugar. Mix well, then cut in shortening until mixture resembles coarse meal.
2. In a small bowl, combine egg, vinegar, and 4 tablespoons of water. Whisk together, then add gradually to flour mixture, stirring with a fork. Mix until dough forms a ball. Add one more tablespoon of water if necessary.
3. Allow dough to rest in refrigerator 10 minutes before rolling out.

Source:  Allrecipes.com

Apple Filling:

2 cups small diced (peeled) Granny Smith apples or your favorite apple
2 teaspoons fresh lemon juice
1/2 teaspoon cinnamon
1/4 cup sugar
2 teaspoons all-purpose flour
Egg wash (1 egg lightly whisked with 1 Tablespoon water)
Crystal sanding sugar (optional)

Directions:

Make the filling:

In a small bowl, combine the apples, lemon juice, cinnamon, sugar and flour, stirring until thoroughly mixed. Set aside.

Apple Hand Pie

Assemble the pies:

Preheat the oven to 425ºF.

Remove the dough from the refrigerator and roll out.

Using a 4-inch (or whatever size you want your pies to be) circular cookie cutter or cup, cut out as many circles as possible. Re-roll the scraps and continue cutting out circles until you run out of dough, ensuring you end up with an even number of circles.

Place six of the dough circles on a Silpat or parchment paper-lined cookie sheet. Spoon a small portion of the apple filling into the center of each circle, leaving enough of a border around the filling. Place a second dough circle atop each filled circle then use a fork to crimp the edges together, sealing each pie.

Brush each pie with the egg wash, and using a sharp knife, cut two or three vents on the top of each pie. Sprinkle the pies with crystal sanding sugar (optional).

Bake the pies for about 17 minutes, or until they’re golden brown.

Remove the pies from the oven and allow them to rest for 10 minutes before serving. Repeat the filling and baking process with the remaining dough circles.

Apple Hand Pie


Blueberry Pastry Delights

Blueberry Danish Delight

As the name of this recipe implies this pastry recipe is delightful.  Very rarely will you see me using “something in a can or a box”.  I almost always make everything from :”scratch”.  This was one exception and I admit, they were quite good and very quick and easy to make.  Go ahead … try some delight!  ENJOY!

Ingredients

  • 1/2 cup cream cheese
  • 2 tbsp sugar
  • 1 tsp vanilla
  • 1/2 tsp cinnamon
  • 1 can crescent rolls
  • 1 cup blueberries

Instructions

  1. Begin by combining the cream cheese, sugar, vanilla and cinnamon in a small bowl.
  2. Roll the crescent roll dough out and press the perforations together.
  3. Slice the dough into 8 equal squares.
  4. Top each square with a spoonful of the cream cheese mixture.
  5. Pile the blueberries on top of the cream cheese.
  6. Fold the corners of the dough into the middle and place each pastry on a baking stone.
  7. Place in the oven at 375° for 12-14 minutes or until golden brown.  (My oven took 11 minutes.)

Blueberry Danish


Source: Littleleopardbook.com

Cinnamon Lovers . . . Fall in Love with Cinnamon Bundt Coffee Cake

Cinnamon Coffee Cake

Is it as good as it looks?  Yes, it sure is!  This is yet another recipe that you can use Vietnamese Cinnamon in.  When I purchased my Vietnamese Cinnamon at Amazon and it came in a 1 lb bag I thought I’ll never use up all this cinnamon.  Amazingly enough I am using it up and it is so, so good.  This cake is fantastic in the morning with a cup of freshly brewed coffee, or for that matter, any time of the day.  Bake and ENJOY!

INGREDIENTS:
Coffee Cake:
3/4 cup butter, room temperature
1 1/2 cups white sugar
3 eggs
1 teaspoon vanilla extract
1 cup sour cream
2 1/2 cups all-purpose flour
1 teaspoon baking soda
1 teaspoon baking powder
1/2 cup chopped walnuts
1 tablespoon ground cinnamon
1/4 cup white sugar
DIRECTIONS:
1. Preheat oven to 400 degrees F (205 degrees C). Grease a 10-inch bundt pan.
2. Beat butter and sugar with an electric mixer in a large bowl until light and fluffy. The mixture should be noticeably lighter in color. Add eggs one at a time, allowing each egg to blend into the butter mixture before adding the next. Mix in vanilla.
3. Combine flour, baking soda, and baking powder. Pour flour mixture into batter alternately with the sour cream, mixing until just incorporated. Fold in walnuts, mixing just enough to evenly combine. Pour half the batter into the prepared pan.
4. Mix the remaining 1/4 cup of white sugar with the cinnamon.
5. Sprinkle cinnamon sugar over the batter in the pan. Drop remaining cake batter in heaping spoonfuls over filling, covering it as best you can.
6. Bake in preheated oven for 8 minutes. Lower heat to 350 degrees F (175 degrees C) and bake for an additional 40 minutes, or until a tester comes out clean.Source: Allrecipes.com


Cinnamon Coffee Cake

Cinnamon Coffee Cake


Dreaming of Spring Flowers and Butterflies – Sugar Cookies

Butterfly and flower decorated sugar cookies

I’ve been a busy baker!  It seems I have gone from the Pasta Princess to the Cookie Queen!  I started a business from my home “Sugar Cher’s Cookies” and have been selling my cookies and have had quite a few orders these past couple of months, leaving me with not much time for anything else.  I will be slowing down as the weather turns nicer as I will need to devote time to my garden and enjoying the outdoors.  I had fun creating these flower and butterfly cookies.  ENJOY!

Flower and Butterfly decorated sugar cookies

Decorated Flower Sugar Cookies

Decorated flower and butterfly sugar cookies

Decorated flower sugar cookies

Christmas Sugar Cookies with Royal Icing – Snowmen and Snowflakes

I baked and decorated a lot of sugar cookies this year!  I love the way sugar cookies look decorated with royal icing.  They can be elegant or whimsical and this sugar cookie recipe is so good!!  Not only does it taste fantastic but the dough is so easy to work with.  The cookies are baked at a high temperature for a short period of time so they don’t spread and lose their shape.

Snowman Christmas Sugar Cookie

It’s hard to believe I started decorating cookies 2 years ago … time flies!  I’ve learned a lot about decorating, picked up valuable tips, and am much quicker since I first started decorating.  There are great sources of inspiration and tutorials on the internet.  A good place to start is here at The Sweet Adventures of Sugar Belle.  She has numerous tutorials and tips and is the “Queen of Sugar Cookies”!  Seriously, her cookies are amazing.

Christmas Sugar CookiesOne of the best tips I picked up is that you don’t always have to make two consistencies of icing for flooding and piping,  And you do not have to wait to let the outline dry before flooding your cookie.  In fact, if after piping your outline and you flood your cookie immediately you create a seamless cookie which is much more attractive!  The more cookies you do, the better you get!  Go ahead … give it a try … you’ll love the results!

Christmas Sugar Cookies with Royal Icing

Christmas Snowflake Sugar Cookies

Christmas Sugar Cookies with Royal Icing